I saw this article on Facebook and thought it might be of interest to others.
How to pack and ship pinned insect specimens
Posted on November 1, 2013 by Ted C. MacRae
Even though I don't work in a museum, sending and receiving pinned insects is a routine activity for me. As a collector of beetles with some expertise in their identification, I've had opportunity to exchange with or provide IDs to other collectors from around the world. Of course, the extreme fragility of dried, pinned insect specimens makes them vulnerable to damage during shipment, especially when shipped overseas. While properly labeled, pinned insect specimens have no monetary value, the scientific information they represent is priceless, and every attempt should be made to protect them from damage during shipment. Sadly, despite our best efforts damage is sometimes unavoidable, as even packages marked 'Fragile' can be subject to rough or careless handling. More often than not, however, I have received shipments in which the contents suffered damage that could have been avoided had the sender paid more attention to packing the shipment in a manner that gave it the best possible chance of arriving safely. Here I offer some general tips on the best way to pack and ship pinned insect specimens for shipment. While these remarks are broadly applicable to pinned insects in general, they are given from the perspective of a someone who collects beetles-specimens of which are relatively small to moderate in size, hard-bodied, and compact in form. Insects from other groups, especially those with large, fragile species such as Lepidoptera and Orthoptera, may require additional precautions to minimize the risk of damage.
1. Select a sturdy specimen box with a firm pinning bottom. The size of the box should be selected appropriate for the number of specimens-i.e., do not select a large box for only a few specimens or tightly pack too many specimens in too small a box, Modern polyethylene foams used in pinning trays seem sufficiently firm to hold pinned specimens during shipment as long as they are at least 1/4in thick-thicker foams, of course, will hold even more firmly but often "push" the labels on the pinned specimens up against each other, necessitating additional labor to reset them. The box should have a tight-fitting lid that can be set firmly in place. Pin the specimens into the box, making sure the pins are set completely through the foam and taking care not to overpack the specimens within the box too tightly (body parts, especially antennae and tarsi, should never overlap) that could result in damage to them or adjacent specimens during removal. Ideally the specimens should fill the box completely, but if they do not then fill the empty space with blank pins to avoid large, blank areas of foam bottom without pins. Here is an example of a filled specimen box:
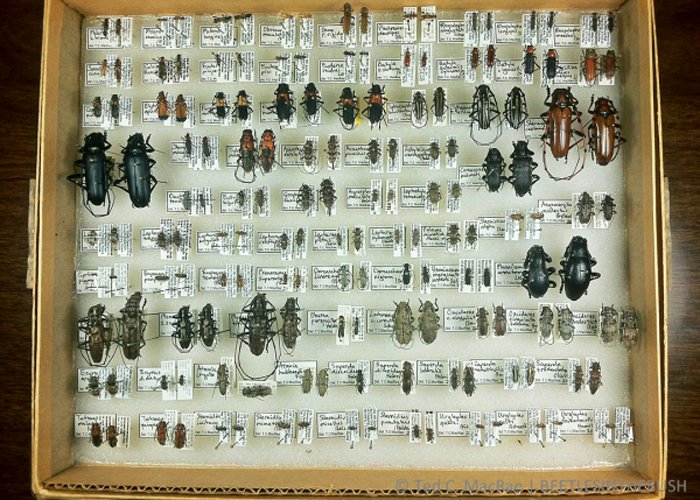 |
Pinned insects in specimen box ready for packing.
2. Use brace pins for large or heavy specimens. This is one of the most common mistakes I see! In the example above, several of the larger species are surrounded by brace pins to keep them from rotating on their pins and damaging neighboring specimens. At least two pins should be used?I place them against the elytra on each side behind the hind legs, and very long or heavy specimens should be further braced by additional pins on each side of the thorax to further ensure they are fully immobilized. Although not shown in this example, specimens with very heavy heads (large mandibles, etc.) should be even further immobilized with additional pins at the head. Here is a closeup view of some of the specimens in the above box that have been further secured with brace pins:
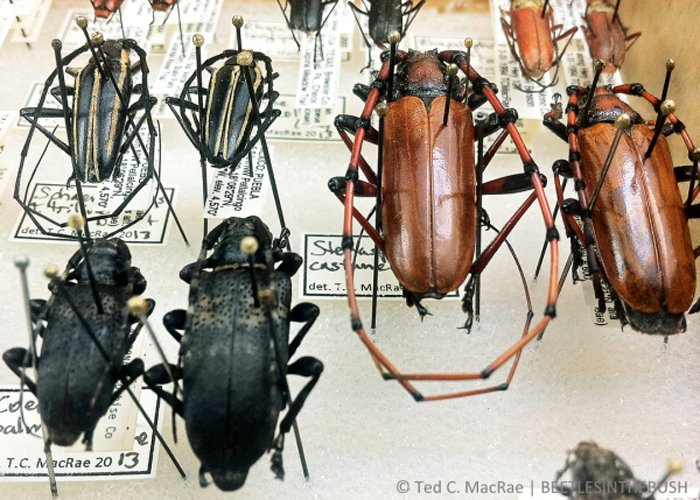 |
Large specimens are further immobilized with brace pins.
3. Use an inner lid with padding to hold it firmly against the specimens. An inner lid lies on top of the specimens underneath the specimen box lid to keep the specimens securely seated in the foam and prevent them from "working" their way out. Some specimen boxes designed for shipping, such as the examples shown in these photos, come with an inner lid that is hinged on a long side. If the specimen box lacks an inner lid, one should be fashioned from cardboard or heavy card stock. The advantage of an attached inner lid is that it will not move inside the box, so if an inner lid must be fashioned it is essential to trim it so that it fits precisely within the box to minimize the potential for movement. I like to draw an outline on the cardboard with the specimen box and cut on the lines, then shave off extra material from each side to shape it to the inside perimeter of the box. Either way, make a "pull tab" out of adhesive tape and attach it to the inner lid to allow easy removal during unpacking. If the inner lid when set in place does not seat firmly against the outer lid, extra padding material such as paper towels should be placed on top of the inner lid to ensure that it sits firmly against the specimens when the outer lid is set in place. The specimen box with inner lid in place, pull tab attached, and extra padding placed on top is shown below:
 |
Cover the inner lid with padding to secure it firmly against the specimens.
4. Seal closed specimen box with tape or rubber bands. The outer lid of the specimen box should be secured in place so that it does not "work" its way loose. Some people use tape, which is effective but must be cut if the box is opened for inspection, leaving the lid unsecured afterwards. I prefer to use sturdy rubber bands, which can be removed for inspection and then easily replaced afterwards. Some specimen boxes come equipped with metal tabs or hoops that fit through slots on the outer lid and that can be bent over to secure the lid in place. In my experience, these often break off after repeated use, so rubber bands or tape are a good insurance policy for such boxes. Another common practice is to wrap specimen boxes in packing paper or place them inside plastic, Zip-Lock bags. This was necessary in the days when excelsior shavings were often used as a packing material around the specimen box, which contained shavings that could work their way into the specimen box and cause damage. With the ready availability of modern packing materials such as foam peanuts there should no longer be any reason to use excelsior shavings. Still, wrapping or sealing inside a plastic bag can't hurt if it is desired. A closed specimen box with rubber bands securely in place is shown in the photo below:
 |
Specimen box sealed with rubber bands
5. Place an address label on the specimen box. This will ensure that the shipment does not get tossed into the "dead mail" pile if the outer address label is lost or destroyed (I've left the label off in these examples to ensure privacy of the recipient).
6. Secure multiple specimen boxes tightly together. If multiple specimen boxes are shipped together, they should be secured tightly together so that they cannot "bump" into each other during shipment. As mentioned before, tape works but might end up being cut for inspection, so I prefer to use large rubber bands. String can also be used to tie the boxes together, but unless the inspection agent is handy with knots the boxes may not get tied back together. The two specimen boxes included in the shipment I used for this example, secured tightly together, are shown below:
 |
Multiple boxes should be bound tightly together.
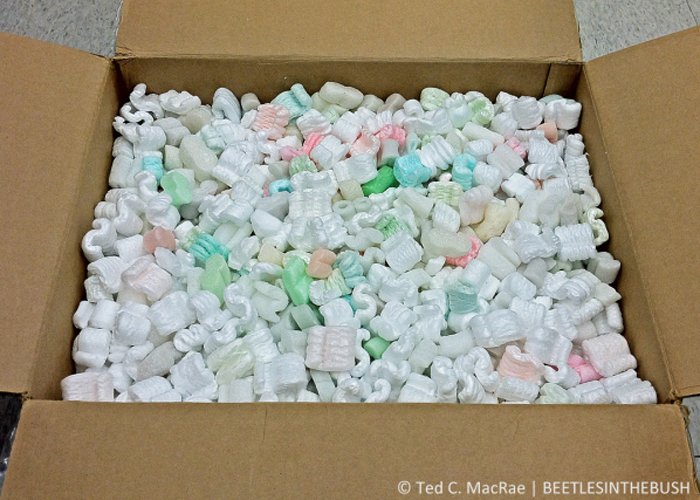
7. Pack specimen box inside an oversized shipping box. Shipping box size selection is critical! The shipping box should not only be sturdy but also big enough to accommodate specimen boxes with at least 3-4 inches below and 2-3 inches on top and each side of the specimen box. This space is necessary to allow the packing material to function not only as cushioning but also in "shock absorption". My preferred packing material is foam peanuts, since it doesn't settle during shipment and the amount used can be tailored precisely to the needs of an individual box. The photo below shows the pinning boxes resting on a 4-inch layer of foam peanuts with at least 2-3 inches of space on the sides and above:
 |
Place specimen boxes inside a sturdy shipping box with plenty of room on all sides.
8. DO NOT OVERPACK! This is the most common mistake people make! The packing material needs to serve two purposes: 1) provide a crush zone to protect from direct damage, and 2) provide shock absorption to protect from damage by impact jarring. The specimen box actually needs to be able to move slightly within the closed shipping box. If it cannot, energy from impacts is transmitted in full to the specimens inside, greatly increasing the risk that heavier body parts (especially the head/pronotum) will be jarred off the specimens. This not only results in damage to the broken specimen, but the dislodged body parts then act as "wrecking balls" that bounce and tumble inside the specimen box, destroying all of the specimens within their reach. After placing a 3-4-inch layer of packing in the bottom of the shipping box, I like to set the specimen box(es) on top of the foam in the center of the shipping box and fill the shipping box with additional foam peanuts to within about 1 inch of the top. Avoid the temptation to fill the box to the brim, or to "settle" the foam peanuts and add a few more, as this will result in a tightly packed box that does not protect the specimens as well as a more loosely packed box. To test, close the flaps on top of the box and give the box a light up-and-down "shake", you should feel the specimen box bounce slightly inside. If it does not, remove a small amount of packing peanuts and repeat the test. If you cannot remove enough packing peanuts without exposing the top of the specimen box inside, your shipping box is too small and you should select a larger size. The photo below shows the shipping box filled with packing peanuts to the proper level:
 |
Shipping box "almost" filled with packing material.
9. Label the package "FRAGILE". Whether this is actually helpful or invites abuse by some passive aggressive handler is a matter of debate, but I am of the opinion that a majority of shipping personnel will actually treat the package with a little more respect if they see this label, especially with the disclosure that the contents are preserved insects with no commercial but extreme scientific value. Additionally, disclosure of such information may actually be required by some destination countries, so it's a good idea to label packages as a matter of routine practice. I like to place one label on top of the shipping box and additional labels on all four sides. BioQuip Products sells moisture-activated adhesive labels as shown below, or similar labels can be designed in a word processing program and printed on blank adhesive labels; however, the latter should be covered with clear tape to prevent them from peeling off of the shipping box during transit.
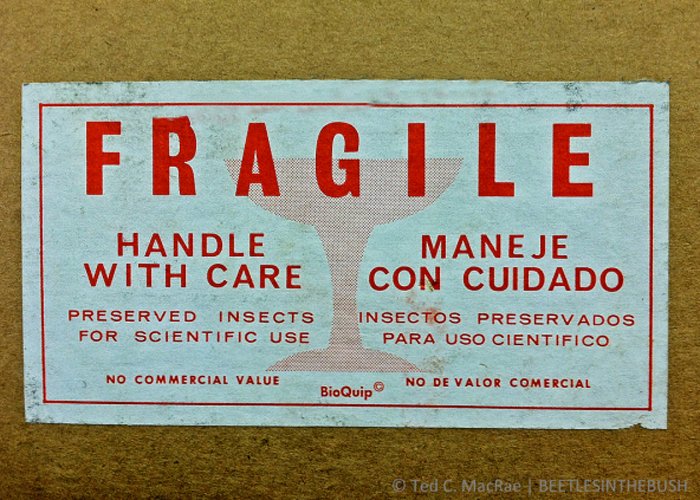 |
Place a fragile sticker on top and all four sides.
Much of what I have written here I learned as a graduate student, based on a much more detailed article by Sabrosky (1971) that provides additional suggestions for extremely rare and valuable specimens, advice regarding the different postal classes available for international shipments, and a list of "Don'ts" under any circumstances. Also a disclaimer: I am an amateur-albeit a highly practiced one, and there may be additional suggestions or advice from professional collection managers and museum curators that would be highly welcomed in the comments below should it be offered.
REFERENCE:
Sabrosky, C. W. 1971. Packing and shipping pinned insects. Bulletin of the Entomological Society of America 17(1):6-8.
Copyright Ted C. MacRae 2013